Thursday, January 3, 2013

Finger Painting Fun

I work part-time, so I am home with the girls 2 days each week.  I absolutely LOVE having those days with them!  But most of our time is spent just playing with toys in the living room, and on a rare occasion, we might run a few errands.  I thought that they might be getting bored or restless just hanging out in the living room all the time...

So, I decided I'd try adding a structured activity to their days I spend with them.  It would be fun for babies, and fun for mommy!  Or so I thought...


Since they just turned 1, it's not like their motor skills are that great, so we couldn't really attempt to paste some googly eyes onto a toilet paper roll to make some kind of animal (or something like that...).  But finger painting sounded easy enough...

Our first attempt was based on an idea I found for "clean finger painting" on Pinterest.  Basically, you put a piece of paper into a large Ziploc bag with a few globs of paint, and let baby play.  And that's what we did.

I set up all the supplies, sat the girls in their high chairs, and let them get to work!


Violet gets to work on her Clean Finger painting project


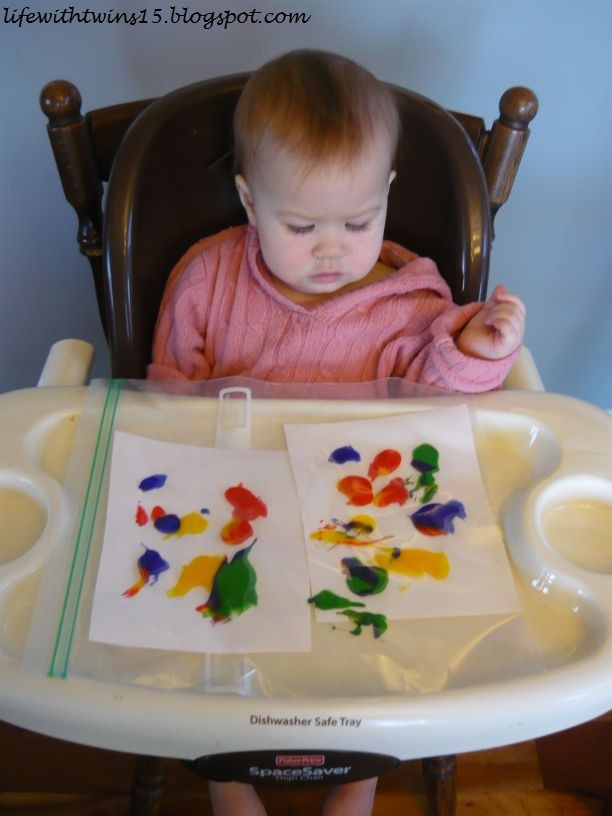
Charlotte isn't really sure what to think about this Clean Finger painting project

Clean Finger Painting


Violet


As you can see, Violet seemed to enjoy the project. She liked to crinkle the Ziploc bag, and wave it all over the place. Her colors really spread nicely over the paper!


Charlotte


 Charlotte wasn't really sure what to think... I gave her a little more guidance by pushing her hands onto the paint and showing her how when her hands moved the paint would smear and the color would spread.  I'm not really sure if I was supposed to do that, or if I should have just let her figure it out on her own...

Unfortunately, I forgot to take a picture of their finished art work!  Oh well, there's always next time...

Lessons learned from this project:
1) Don't use too much paint, it really soaks the paper and gets gloppy, which causes it to take a really long time to dry.
2) There has to be a better way of getting the art work out of the plastic bag without getting paint all over my hands... I just haven't figured it out yet. :-)
3) Don't forget to take picture of completed art work!

So, Clean Finger painting was a nice little change from our usual routine.  It gave the girls a "new toy" to play with, and it resulted in some great art work that we used as 'Thank You' cards for their birthday presents from my family.  But it only entertained the girls for a limited amount of time, maybe 5 minutes... And it probably took me that long just to get everything set up for them.

Since I felt like Clean Finger painting was boring, I figured we were ready for some real finger painting!  I also really wanted some cute home-made gifts from the girls for the Illinois side of the family.  So, I found this project on Pinterest, it's a Christmas tree with lights or ornaments. 

We could totally do that!  The girls just needed to paint a sheet of paper green, and then do some hand blobs of other colors randomly on the paper.  It couldn't get any easier!  Or so I thought...

I stripped the girls down to their diapers, and again put them in their high chairs.  I'd learned from Pinterest that it is best to tape the paper to the tray so that it doesn't move around.  I just used a few pieces to tape down the corners.   I'd also learned to have lots of wipes on hand, so I had a bunch of wet paper towel ready to go for clean up.  Then, I put some green globs of paint on the paper and put the trays in front of the girls... That's when the fun started... :-)

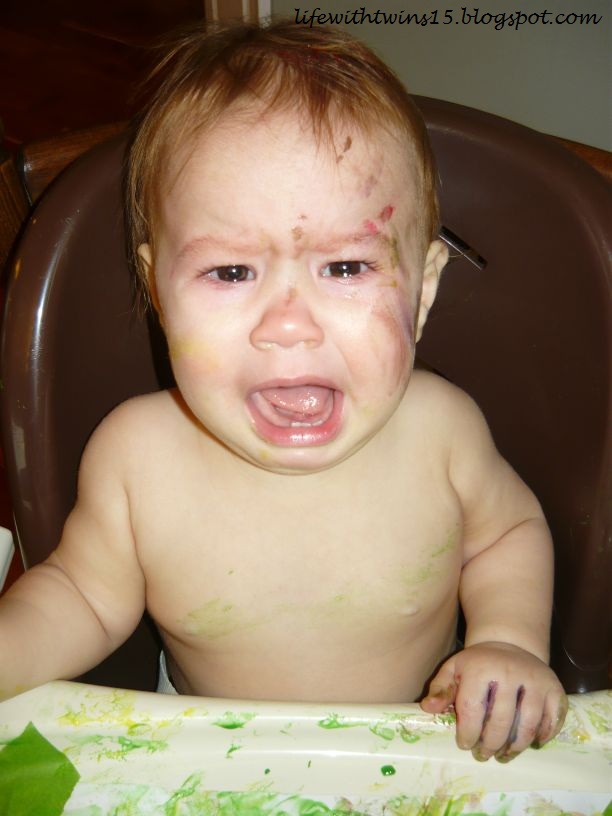
Charlotte immediately began to eat the paint.  I guess I confused her because when they are in their high chairs, everything I put on the tray is food...  I doubt it tasted very good, and my reaction of grabbing her hand out of her mouth and telling her "No!" probably didn't help the situation.  I grabbed some of the wet paper towel (thank goodness I had that easily accessible!), and wiped her face and hands.  But she continued to cry, and kept trying to put the paint in her mouth...


Charlotte is not a fan of how finger paint tastes...

Violet, however, had no problems getting started.  She instantly began to smear and smack the paint around on her paper.  Of course, because the paper wasn't as big as the tray, she had a little trouble "staying inside the lines" and paint was everywhere...

Violet wondering why Charlotte is crying...

Violet loves to finger paint!


I ended up having to take Charlotte out of her seat to calm her down, and when I put her back in, I decided to try a different tactic.  I had purchased these little paint sponges from the dollar store, so I gave her one of those to try and paint with, so maybe she wouldn't eat the paint.  It helped... a little...  :-)


Using dollar store paint sponges to paint the "Christmas Tree"

I decided that they had enough green paint everywhere, and it was time to start the lights/ornaments part of the picture.  I put globs of the other colors on a paper plate, and dipped each girls hand into one color, in hopes that they would just smack their hand down in random spots to create the lights/ornaments.  That is NOT what happened.  The girls just smeared the paint all over their "Christmas Tree"...

That's when things started to get really messy.  Yikes!  I mean, I was prepared that there would be paint all over their hands and arms, maybe even their bodies... But I didn't really think about it getting in their hair, on their faces, up their noses, in their ears, and all over their high chairs!!!!  I don't know what I was thinking trying to tackle this project with just me and the girls!!!  Wet paper towel was not going to clean up this mess!!!

Charlotte getting messy...
It's still messy, even with a paint sponge... which they would drop off the tray, causing paint to get on the floor...

Violet adding lights and ornaments to her tree, and face, and body...


Messy Violet...


Charlotte eventually started enjoying finger painting!


Having fun finger painting!

"We need a bath!"
Violet at the end of the project...

Charlotte at the end of the project...

Well, Charlotte ended the project the same way she started!  At least she had a little fun in the middle! :-)

I finally decided that enough was enough.  Their "Christmas Trees" were complete.  Again, I forgot to take pictures of the final product...

I removed the trays from the high chairs and just looked at the girls.  Where was I going to start with this clean up?  I attempted to wipe off most of the paint with the wet paper towels, but I knew that just wasn't going to cut it.  So, I did the best I could with one baby, and set her off to play while I gave the other a quick bath. 

Giving each girl a bath is a serious workout, especially since I'm getting to be gigantic pregnant.  They squirm and wiggle and splash all over.  And just when the bath is done, it gets even worse trying to dry them off, put lotion on them, get a diaper on, and then clothes.  I pretty much have to chase them around with lotion on my hands and pray that they don't pee on the floor.  Then, once I have at least a diaper on one baby, I still have one more baby to bathe!  I can't bathe them both at the same time yet, I'm just not that coordinated, I'm too pregnant, and they are just way too wild in the tub.

Lessons learned from this project:
1) Wait for the first layer (Christmas tree) to dry before adding the lights/ornaments, otherwise, it all just smears together. 
2)  Have bath supplies prepared for clean-up.
3) Tape all 4 edges for the paper completely.  Violet ended up ripping her artwork because she could grab the edges that weren't taped and pull them up.
4) Put down a cloth of some sort beneath the work area so paint does not get on the floor.
5) Paint somewhere they don't usually eat, so they don't think it's food.
6) Don't forget to take picture of completed art work!
7) Maybe try this when there is another person around to help...


So, all in all, Real Finger painting was a lot more intense that Clean Finger painting! And it definitely consumed a lot more time, and was much more entertaining.  It was far from boring!  By the time everyone was all cleaned up, it was nap time for the babies but I was really the one who was exhausted!

At least now I know what to expect, so maybe next time it won't be so crazy... but 'next time' might not be for a while...  :-)

If anyone has any tips/tricks for a better way to finger paint, please let me know.  Also, if you have any ideas on fun activities I can do with the girls, feel free to share.  Thanks! :-)

UPDATE 3/25/14: Since having my 3rd child, my days have become more than just "life with twins."  So, I decided to move on over to a new blog!

Come check me out at www.MePlus3Today.blogspot.com!
My new blog deals with kids crafts and activities, mommy ups & downs, and what it's like to suddenly find myself as a 30-year-old widow with 3 kids under the age of 2.

So again, please stop by my new blog, and tell your friends too!

Thanks so much!
~Sarah

Tuesday, December 25, 2012

We Survived!

Well, we did it.  We survived our first year with twins!  The girls turned 1 on December 22.  I just can’t believe it.  And I wish I could deny it.  I want them to be my babies for forever!

Somehow, this year has felt like the longest year, and the shortest year ever.  Is that even possible?

When I was pregnant, a mom of 4-year-old twins gave me the book “Ready or Not… Here We Come!”  by Elizabeth Lyons.  I read it.  It scared me.  It overwhelmed me.  It was right.  But it was also wrong.

I’m not going to lie, it hasn’t been exactly easy to get through this first year.  But I definitely don’t think it was as hard as I had read about.  For all the people who say “I don’t know how you do it with two…”, honestly, I don’t really know how we do it either!  We just do!  Somehow, we are able to make it through each day, with the girls growing stronger and smarter every day.  Are there tears (from babies and mommy J)?  Yes.  Is there frustration?  Yes.  Is there exhaustion?  Yes.  But there are also hugs and kisses, smiles and giggles, seeing them meet milestones and watching them play together.  And my favorite is walking into daycare to pick them up and they are so excited to see me that they get the hugest grin on their face and give an excited scream and immediately stop doing what they were doing to get to me as fast they can.

I wish I had done a better job of documenting this first year (seriously, I didn’t even do a baby book, ugh…).  I’m sure the times that I spent vegging out on Facebook or Pinterest during naptime or after bedtime could have been put to better use with this whole documentation thing, but I also needed that time to unwind…  But at least I took a ridiculous amount of pictures and videos, so that will help me keep the memories there. 
I was planning on posting a bunch of pictures from the last year, but there are just way to many that I want to share.   So for now, here are their monthly pictures (which I even missed a few months, oops!).  I can’t believe how much they have changed!  I’m hoping to post another “Year in Review” type post with a few more details, anecdotes, and pictures from that past year, but for now, this is all I have time for!  Maybe that post will come next year… J
Violet Through The Year
 
 
Charlotte Through The Year


Wednesday, December 19, 2012

Pinterest Love

Dear Pinterest,

I have a love-hate relationship with you.  I love you for all the wonderful, creative, genius ideas you provide me at any time.  I hate you because you make me feel inadequate as a mother, as a wife, as a person in general.  I love when you make me laugh.  I hate when annoy me.  I love you because you are a place to easily store these neat ideas I find and can easily reference later.  I hate you because you are horrible when I am searching for something in particular (like crafts to do with babies, I know they are out there, I just can’t find them!).  Either way, I can waste countless hours browsing your unlimited database of “stuff.” 

Today, I love you for providing me with an inexpensive teacher gift idea! 

When we put our kids in daycare, I never thought about having to give gifts to the teachers.  But as the holidays approached, I realized I really needed to do something.  With 3 primary teachers and numerous “floater” teachers that help in the girls room, plus 2 directors of the facility, the cost of gifts can add up quickly!  But I wanted to get them something that they would hopefully get some use out of, and wouldn't just sit on their shelf or get re-gifted at a White Elephant party! :-)

But then, I found this pin on your awesome/horrible site:


Click on picture to see original blog with this craft


 This seemed inexpensive enough that I could use it for all the “floater” teachers that are in and out of the room during the day.  Most people like chocolate, right?  Plus, it’s not just your average candy bar, it took a little time and effort, therefore, it makes it a cute, little gift, right?  I hope you are nodding your head…! :-)

Well for my reindeer bars, I ended up using orange pipe cleaners for the antlers because I couldn’t find brown at Meijer, and Chaz was at home with the girls so I didn’t want to go to a bunch of different stores for supplies.  (There are actually 2 reindeer that have yellow antlers because I ran out of orange… but you get the gist of what it is supposed to be, right???)  I used red pipe cleaner rolled into a circle for the nose.  The googly eyes were on sale for 50% off at Meijer, and I still have A LOT left for future projects needing googly eyes… We’d bought the candy bars on sale as well at a previous shopping trip.  Lastly, I used brown shopping bags to make the reindeer skin.   So, I made a total of 17 reindeer bars, at an average cost of about 55cents each.  I think that will be enough to cover all the random teachers that I want to give thanks to for taking such good care of my kids!  :-)
My completed Reindeer Bars!


But I still felt that the primary teachers and directors deserved something a little better than just chocolate… That is what made me decide on this pin to create this “little something more” gift!
Click on picture to see original blog with this craft

I was able to make 6 of these adorable, little gifts for an average of about $2.61 each!  Call it cheap, but I call it being a smart consumer! J 

The cellophane bags I had leftover from the girls birthday party goody bags, which I had bought a package of 30 bags on clearance from Meijer for 75cents .  I printed out the tags from the link on Pinterest on paper we already had, so I didn’t factor that into the cost.  We also had curling ribbon on hand, and glue for my hot glue gun, so I count that as free.  J  Then, I bought a 2-pair pack of cute socks from the dollar store, and since each gift bag contains only one pair of socks, that portion was only 50cents.  I found the little pedicure set and a quantity of 4 bell ornaments at the dollar store as well.  I found a few clearance nail polishes at Meijer for 70cents, and I also bought a few that were 94cents.  Thrifty, thrifty, thrifty!!!  :-)
My completed Cozy Toes gifts!
A view of one side of the gift bag...
A view from another side of the gift bag...


6 Cute Gifts!!!

In case you haven’t noticed, I’m pretty proud of how this gift turned out.  I know that I would love to get a fun little gift like this, so I’m hoping the girls’ teachers like them too! (I again hope that you are nodding your head in agreement that the girls' teachers will in fact love these gifts...!)  :-)
My completed gifts for the girls' teachers!
Thanks again, Pinterest.  Today I feel worthy of your site.
UPDATE!  I dropped off the gifts to the teachers this morning, and as I was setting them on the counter, I saw one of these gifts (see image below)...  Other people love (and I bet hate) Pinterest too!  It made me feel better because it was comparable to my gift, so my gift wasn't completely inadequate.  Plus, I had thought about doing this exact gift, so now I'm glad I chose something else! :-)
Click on picture to see original blog with this craft

UPDATE 3/25/14: Since having my 3rd child, my days have become more than just "life with twins."  So, I decided to move on over to a new blog!

Come check me out at www.MePlus3Today.blogspot.com!
My new blog deals with kids crafts and activities, mommy ups & downs, and what it's like to suddenly find myself as a 30-year-old widow with 3 kids under the age of 2.

So again, please stop by my new blog, and tell your friends too!

Thanks so much!
~Sarah